Monday, March 28, 2016

Clamshell longarm quilting, with no computer!

 I want to start blogging some of my favorite quilts again,
that I've had the pleasure of quilting.
 
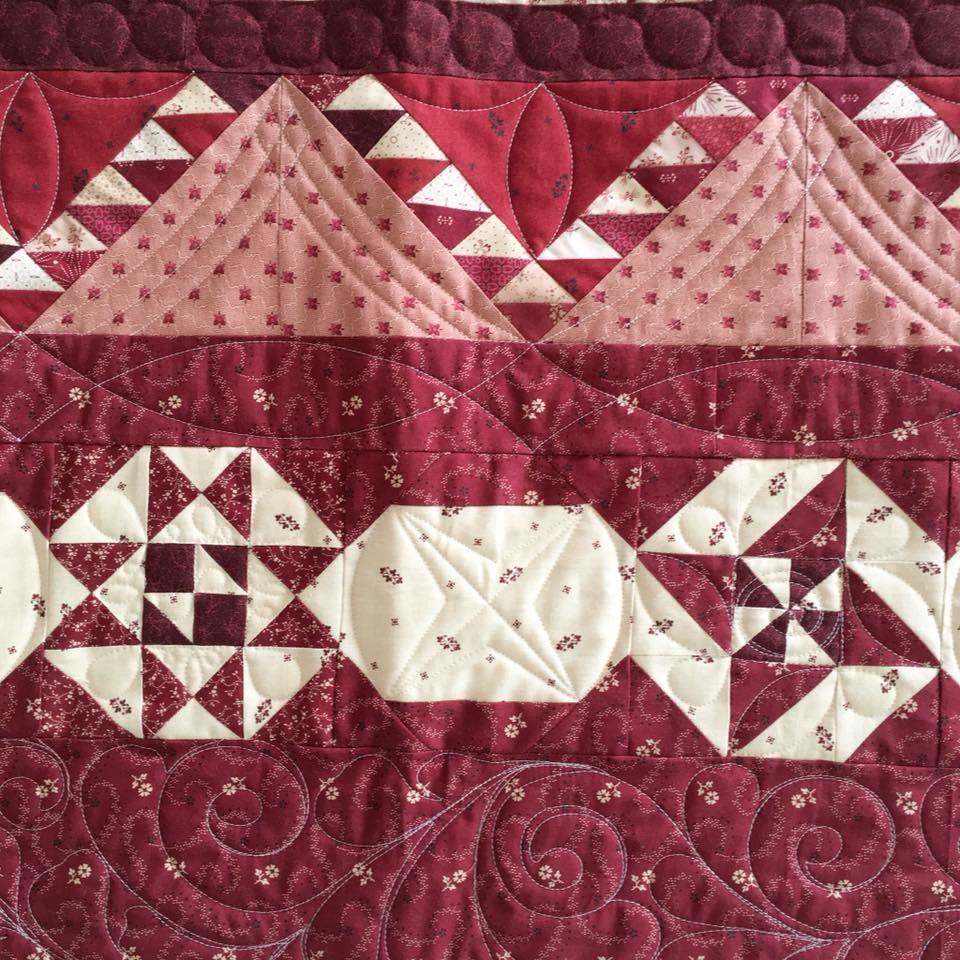
This lovely quilt was made by my sweet friend LeAnn.
She made this tumbler quilt using the Meadowbloom line from April Rosenthal. 
I have some charm packs of this line, it is such a happy colorful line!
 If you click on some of these pictures and look at the fabrics close you can
see how geometric and fun some of them are.  When I looked at it, I just knew
I wanted to do a clamshell quilt design.  I decided to use the 4" circle ruler,
because scale wise with the size of the prints and tumbler blocks...it was just a great fit!
 For years and years I would see this design quilted out with a computerized machine,
and I always wished that I could do it, because I don't have a computerized machine I couldn't...then last fall when I made my sister a quilt for her mission, I knew I wanted to give it a try. 
I had quilted a couple of backgrounds before onwall hangings, but never a full quilt. 
So, I picked my circle ruler size and went for it. 
I knew from the few wall hangings that I did that I needed to start from the bottom, and
create a base or foundation to then quilt each layer on top.  I just went for it.
Then I realized I should have found the center of the bottom of the quilt and start there, then quilt from the center to the right side.  Then quilt from the center to the left side. 
That is how I have started on each of the other clamshell quilting that I've done since then. 
Trial and error right???!   The circle rulers that I use to quilt are super basic. 
They have a line going through the center vertically and horizontally.
 I used those lines to line up the clams as I went along.
If you can believe it or not, I didn't have to mark this quilt anywhere. 
 I made a short video and posted it on Instagram last fall, if you'd like to check it out click HERE. 
I explain how I line the ruler up from one clamshell to the other.  Essentially after quilting out the first full row of clamshells, I would start on the left side of the quilt by matching the left and right side of the horizontal lines on the ruler to the tops of the left and right side of the quilted clamshells, with the vertical line on the ruler centered in the middle of the dip between the clamshells.  (This is explained in the video if that's confusing...turn up the sound, I talk too quiet.)  Then I would use the edge of the ruler and quilt from the top of the left clamshell up around the ruler and back down to the top of the right clamshell, not crossing the line.  Then I would pause to move the ruler, lining it up on the next set of clams, working all the way to the right.  I then quilt up along the outside edge of the quilt so I can continue to quilt from right to left...so on and so forth until I get to the top of the quilt.  
I would like to note because I started at the bottom then quilted and rolled the quilt
to the top...when I got to the top, the quilt top seems to be tighter than the quilt back.  You just have to loosen it a little as you go.  BUT, then it hit me when I was finishing this one, I should have pinned the quilt on upside down and started at the top...quilting of course the clamshells upside down, too.  HAHA!  So, I'm going to try this out the next time I quilt clamshells out and see how it goes.
WHY does it matter, because then I won't have to deal with quilting from the bottom to the top and have issues with the quilt top and back being taut together.  When it comes to quilting a design out, especially without a computer sometimes its trial and error until I figure out the best and most efficient way.  When I quilt this out next time I will try and make an informative video and post it on my YouTube channel.  Until then, you're welcome to give it a try on your own and see how it works. 
Either way, I still love this design!  LeAnn was thrilled!
And look at that raspberry colored Cuddle/Minky.  Love it!!!
Cuddle brand minky is available from Shannon Fabrics, sold in stores worldwide.
Thanks for stopping by!!
 
-Leisha

Thursday, March 17, 2016

My Go To ~ Longarm Machine Quilting Tools

When I started long arm quilting nearly 11 years ago I never thought quilting would evolve to what it is today, and I'm so excited to see what the future holds.  In the beginning there weren't very many quilting tools or tutorials on how to use them.  Now, wow!  I'm blown away at the talent I come across on a daily basis.  The quilting and machine quilting community is booming and it is so exciting!!

I would like to do a series of posts and share my favorite go to tools that I use to either long arm quilt or to sew.  First up, my great friend Linda Hrcka (who has a heart of gold) is an outstanding long arm quilter, and she has created some long arm rulers that I recommend to any and every long arm quilter.  I won't need a different set of curve or straight rulers ever!  Let me tell you why...  I love rulers that are created for quilters by quilters.  They understand the need for the right curve, length, line markings...on the rulers themselves, the durability, the functionality and so forth.  Linda has taken the time to develop and perfect them, which makes my job as a quilter easier.  I can rely on the curve or measurement to be consistent, which creates something rather beautiful in the end. 

My favorite curve rulers of Linda's are the #10, #12, #15, and #20.  They each have different lengths and curves; which makes them perfect for quilting designs in sashing, borders, blocks and so on!  The possibilities are endless.  Head over to instagram and check out the hashtag #theqpcurvetemplates to see all the amazing designs quilters from all over the world are creating.  Here are a few designs that I've come up with on client quilts and one of my own...

This is a quilt of my own.  I used Gooseberry fabric by Vanessa from Lella Boutique, from Moda.  The quilt pattern is called Moda Love, and is a free pattern from Moda.  I used the #15 curve ruler from Linda for the corner of the blocks, and the #10 curve ruler for the sashing.  I love love love the look that these curves create! 
 This very center part of the quilt, which is actually where the sashing meets is my favorite part of the whole thing.  I was hoping for something awesome when I was finished, and I couldn't love it more.  Those curves created from Linda's rulers...I'm speechless at the result. 

 This stunning quilt was made by Barbara, one of my clients who has become a dear dear friend!  Love her, and felt so privileged to quilt this for her.  The pattern is by Pam Buda and is called, Prairie Gathering.  Wow, huh?!?!?!!!!  I knew I wanted to use Linda's curve rulers throughout, starting with the borders.  Its difficult at times to figure out what to quilt in those on point triangle blocks that are often in quilt borders.  I saw Linda and Kathleen (from Kathleenquilts.com) create this design and knew I wanted to replicate it.  Linda's #20 ruler was my first choice!  I think that one is my favorite curve and ruler length!  I'm exciting to use it on one of my own quilts soon.    
 Right next to the freehand outside border (on the right) is that long straight border...this design happens to be one of my favorite ways to dress up a border or sashing!  I used a #15 curve ruler from Linda...love it!
 
 A couple more pictures of Barbara's quilt!


 Julie made this simple half square triangle quilt, and I had the opportunity to quilt it a couple of weeks ago.  I wanted to make the white background around the block pop!  So, I used #10 ruler with a half inch spacing, I couldn't love it more.  I used the #12 ruler for the inside curve on the echoed petals on the green block.  It's fun for me to see the difference quilting can make on a simple quilt block.
 Love love love quilty curves!
 
Have I convinced you yet these rulers are worth every penny!!!  Head over to Linda's shop:  http://thequiltedpineapple.bigcartel.com/ and check them out, and the price is pretty great!!!  Her curves and straight rulers are sold individually or as a set, or you can get all of her rulers in one big set.  I didn't mention the two smallest curve rulers.  The smallest called the BFF is created to help you quilt around applique or the like.  It fits right in your hand, and it the perfect little ruler for guiding your machine into those tight spots.  The #8 ruler is the second smallest and is great for those slight small curves, perfect for inside blocks. 
 
Here is a short youtube video of me using the #12 ruler, enjoy:
 
 
Linda recently created a set of 3 straight rulers!!!  Of course several quilters, myself included were excited!  Look at all those awesome lines...I'm super excited to use them more and more!
 
 I was more than thrilled when Linda sent me a set the other day, perfect timing too...

 
I have only used the longest ruler, a 16" length once, and I already know this is going to be my go to straight ruler set.  The most important thing when using rulers is to avoid having them slide on you while your quilting.  In the past I've attached some grip dots to the bottom of my rulers.  With this ruler I didn't have to, why you might ask...Linda added an extra 1/2" to the width of the ruler.  Which may not seem like it would make much of a difference, but it does!  My hand was able to grip it better, yay!  I used this straight ruler to do the 1" border, in the white, and the on point diamonds on the first inner border. (pictured above)  I'm excited to use the grid lines on the rulers in the future.  Linda just made measuring for cross hatching so easy with the on point measurements!!!  And, in case you were wondering...I used the #20 ruler in the red inner border.  Thanks, Linda!  I love what I do, and its a treat to use your rulers.  Creating new designs with your rulers has taken my quilting up a notch!  I appreciate all you do, Linda, to make such an amazing impact on the quilting world.
So proud of you, friend!
 
(the corner of the border...love what straight lines can do)
 
Linda's straight ruler set is also available at: http://thequiltedpineapple.bigcartel.com/ 
 
Which quilting tools would you like to hear about next???
Head over to my instagram @leishakaye and let me know what interests you!
 
Thanks for stopping by,
~ happy quilting, Leisha